
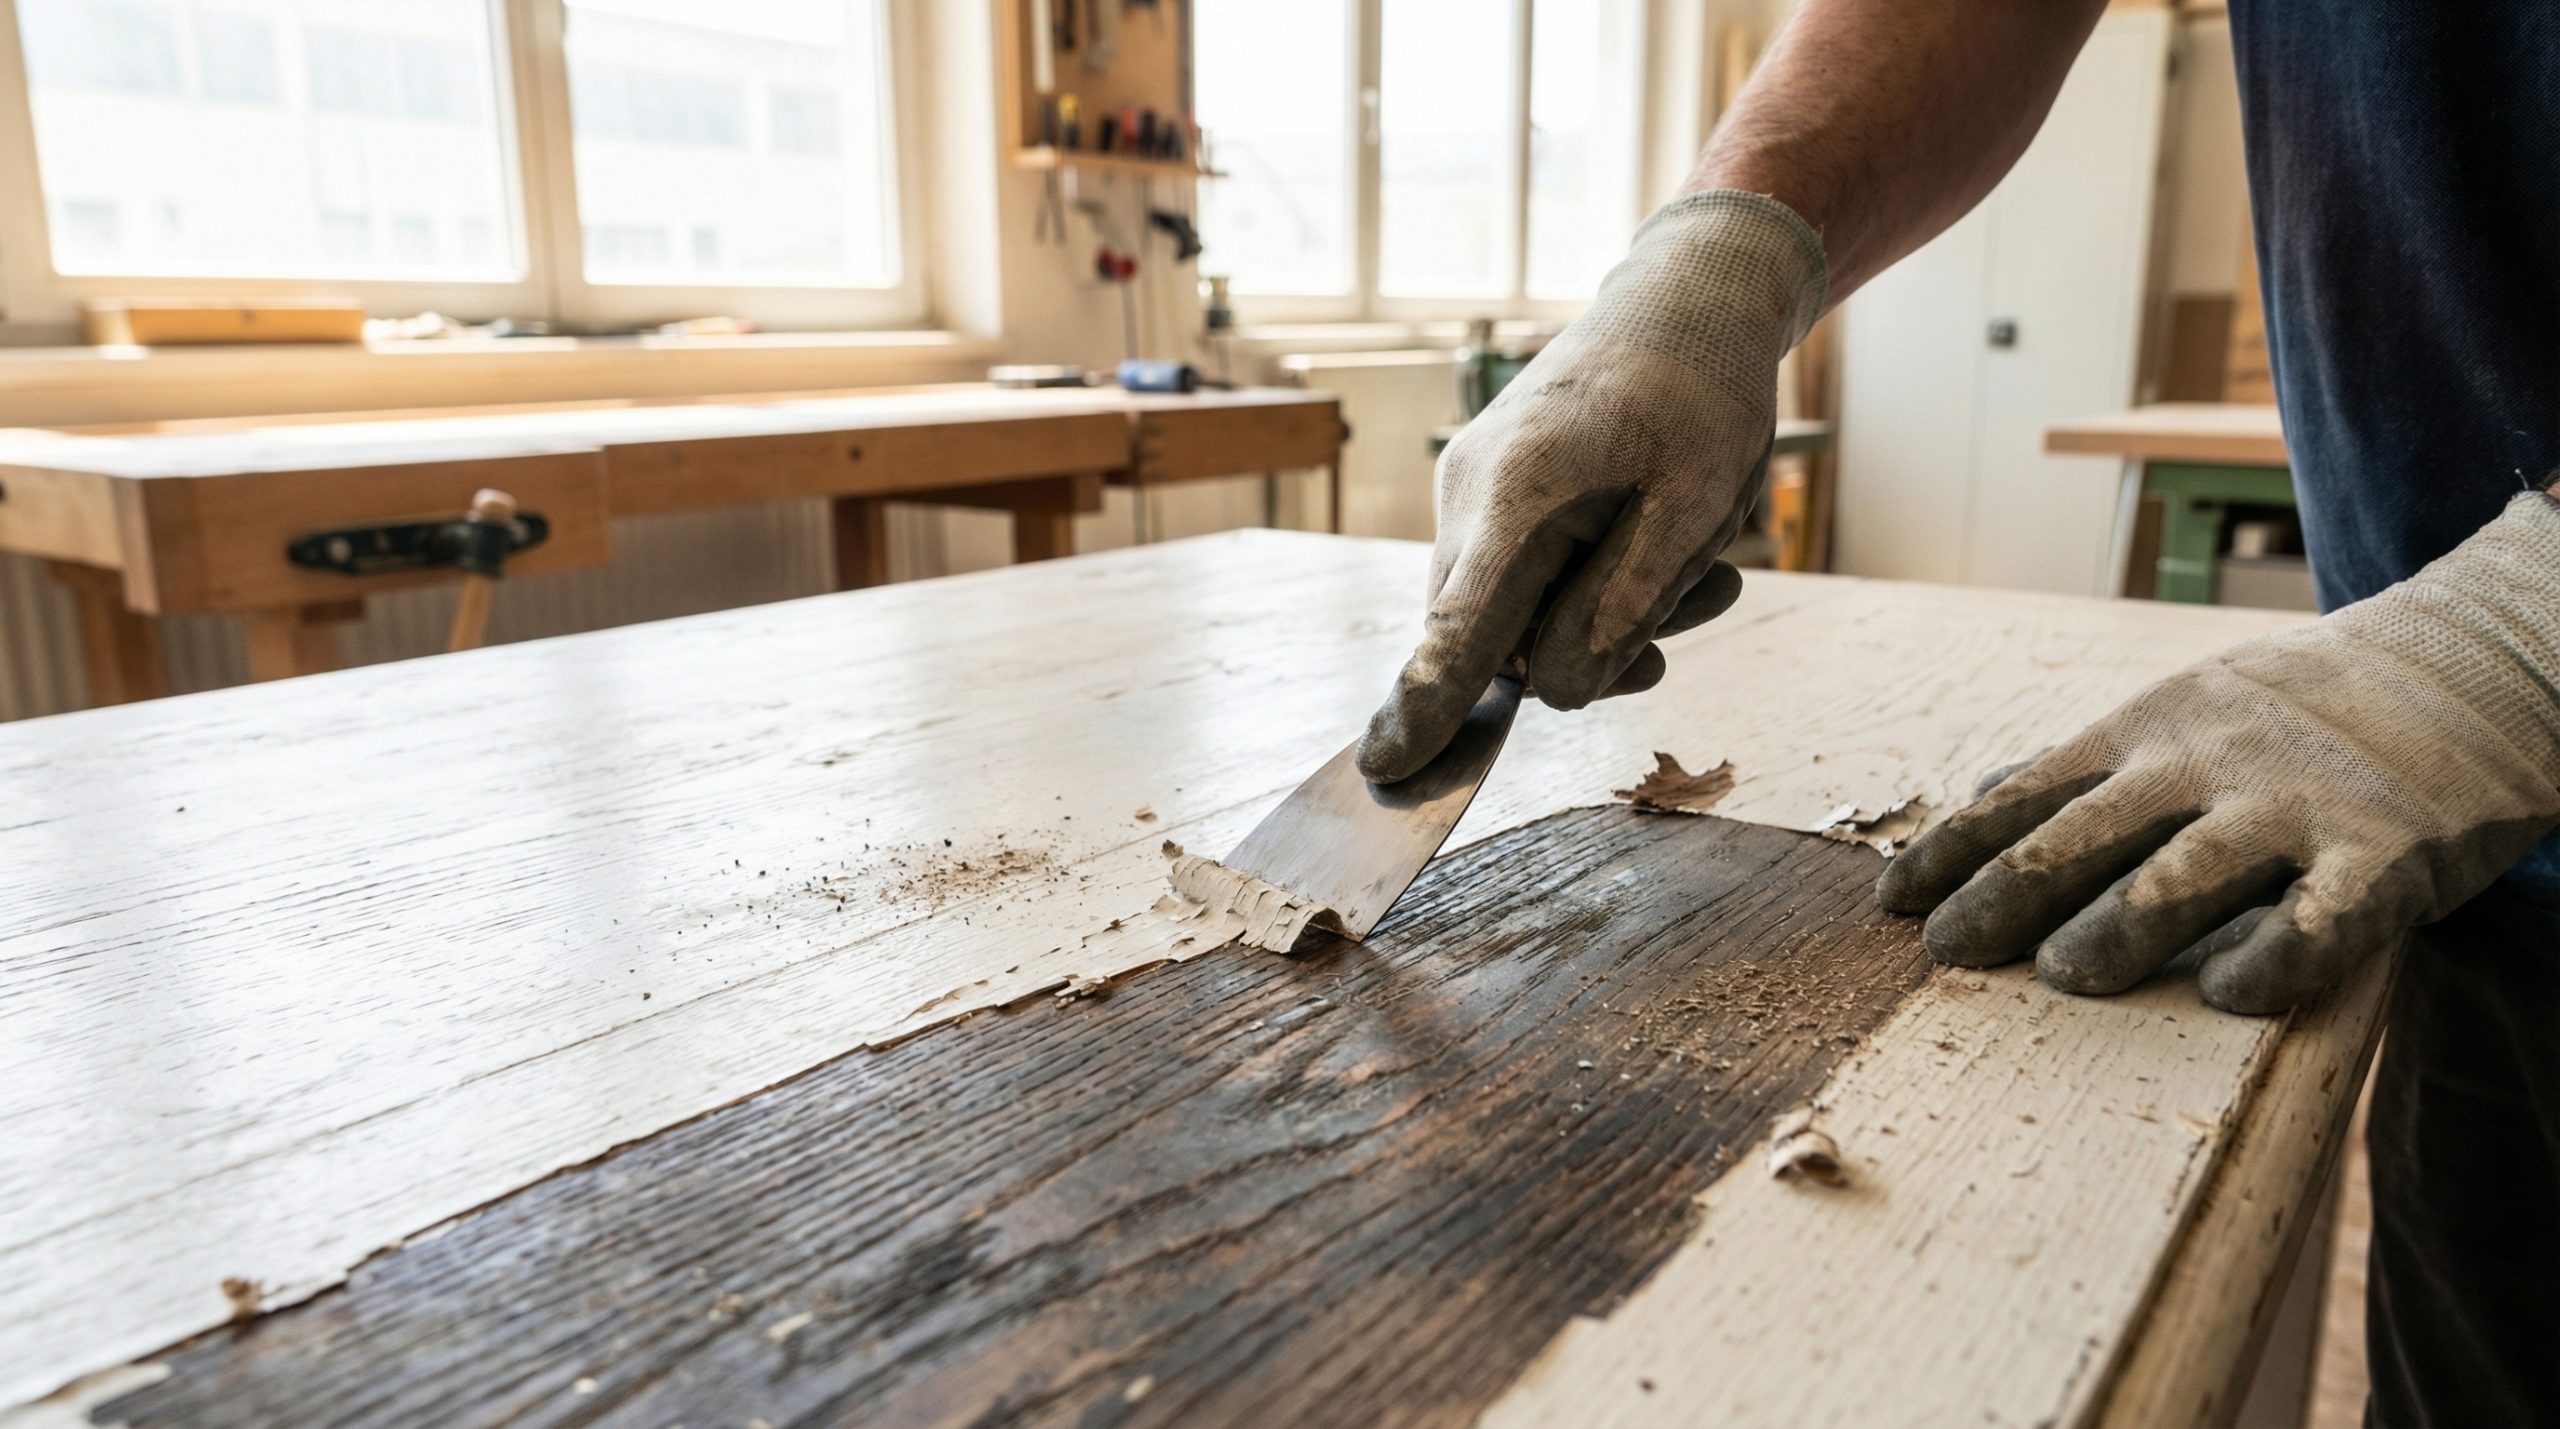
Stripping antique finishes often results in irreversible grain damage or substrate warping. Stop struggling with aggressive methods that destroy value. Professional factory techniques ensure a clean surface while preserving structural integrity.
To remove paint from wood safely, you must assess substrate porosity and use controlled chemical or thermal stripping. Protect the wood by neutralizing solvents and avoiding over-sanding. Professional results require balancing aggressive removal with delicate preservation of the underlying grain.
I. Wood Structure and Substrate Assessment
Successful restoration begins with a comprehensive analysis of the timber’s cellular configuration and current moisture equilibrium. You must determine if the piece consists of open-grained hardwoods or closed-grained softwoods, as this dictates how deeply paint pigments have penetrated the fibers.
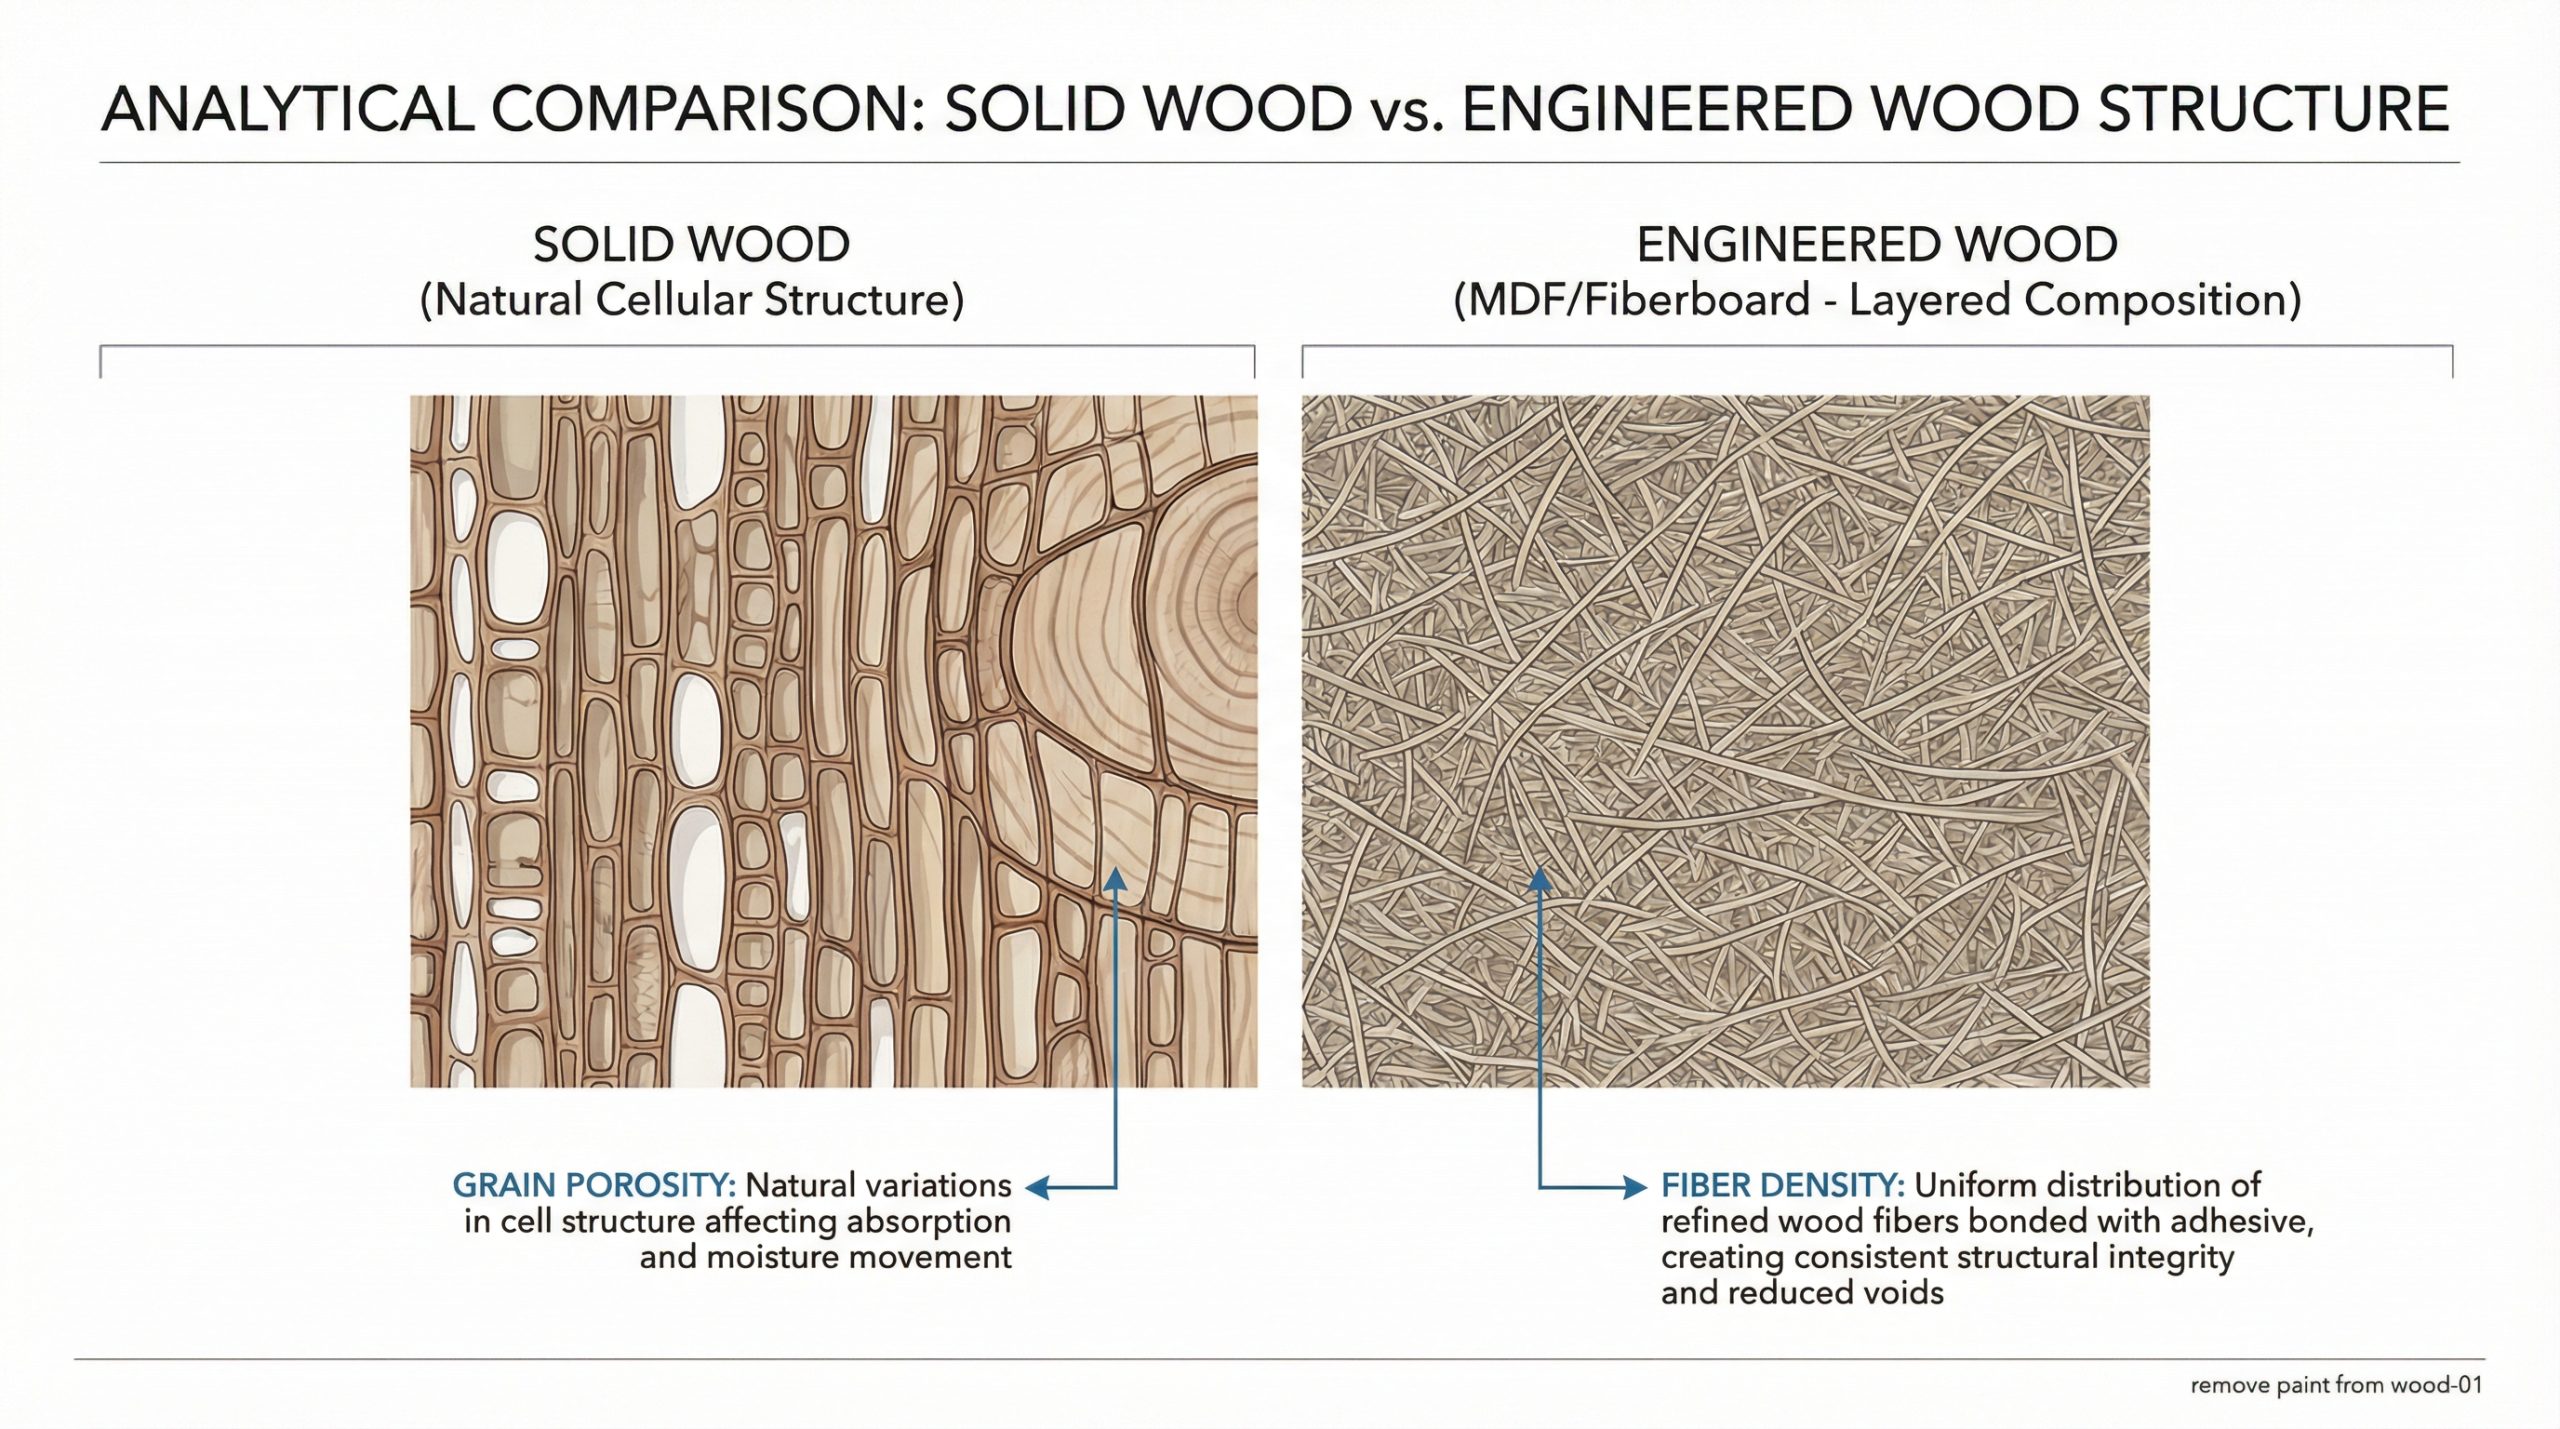
Identifying Solid Timber vs. Composites
Distinguishing between genuine solid wood and industrial composites is the first critical step in any professional refinishing project. You can identify solid timber by observing continuous grain patterns that wrap around the edges of the furniture, whereas composites often exhibit repetitive textures or visible seams at the corners.
- Check the end grain to verify if the growth rings match the face of the board.
- Look for weight discrepancies, as solid hardwoods are significantly denser than particle board.
- Inspect the undersides of joints where manufacturers often leave wood unfinished.
Understanding Grain Porosity and Absorption
Grain porosity determines the extent of pigment “ghosting” where old paint remains trapped in the wood’s vascular system. Open-pored species like oak or ash act as a capillary network, drawing liquid paint deep into the substrate, whereas closed-pored woods like maple offer a smoother surface that facilitates easier stripping.
But here is the catch: even the most skilled technician can fail if they ignore the absorption rates of different species. To avoid permanent staining, professional shops often utilize pre-treatment sealers that prevent the stripping chemicals from driving dissolved pigments deeper into the cellular structure.
We provide a comparative analysis of substrate characteristics below.
| Substrate Type | Porosity Level | Stripping Risk | Preservation Strategy |
|---|---|---|---|
| Solid Hardwood | High to Medium | Pigment Seepage | Controlled chemical dwell time |
| Solid Softwood | Low to Medium | Surface Crushing | Low-pressure mechanical scraping |
| Plywood Core | Low | Layer Delamination | Solvent-free heat application |
Think about it: the foundation of the piece dictates every chemical and mechanical choice you make thereafter. Key Takeaway: Understanding the underlying wood structure is the only way to prevent permanent substrate staining and structural degradation.
II. Remove Paint from Wood: Solid vs. Engineered
Choosing the right method to remove paint from wood depends heavily on whether you are working with natural timber or modern engineered boards like MDF. Engineered substrates are highly susceptible to moisture-induced swelling, whereas solid wood provides a more resilient surface for aggressive industrial stripping agents.
Managing Moisture in Fiberboard Cores
Moisture management is the primary concern when stripping paint from Medium-Density Fiberboard (MDF) or other pressed wood products. Because these materials are composed of compressed fibers held together by resin, the introduction of liquid strippers can cause the edges to “mushroom” or swell, leading to a permanent loss of dimensional accuracy.
- Apply strippers only in thin, controlled layers to minimize liquid penetration.
- Utilize fast-evaporating solvents that do not linger in the fiber network.
- Ensure the workshop environment maintains a low relative humidity to assist in rapid drying.
Structural Risks in Plywood Stripping
Plywood stripping requires a delicate touch to avoid compromising the urea-formaldehyde or phenolic glues that bond the individual wood layers. If a chemical agent migrates through the surface veneer to the adhesive line, it can cause “bubbling” or complete delamination, effectively ruining the structural integrity of the furniture piece.
Think about it: you are managing a balancing act between removing the coating and preserving the bond. Many factories prefer mechanical sanding for plywood to avoid these chemical risks entirely, ensuring that the structural laminations remain intact for the duration of the refinishing process.
This table compares the durability of solid versus engineered wood during the paint removal process.
| Feature | Solid Wood Durability | Engineered Wood Durability | Verdict |
|---|---|---|---|
| Moisture Resistance | High (Internal expansion) | Very Low (Irreversible swelling) | Solid is safer for wet stripping |
| Chemical Tolerance | High (Solvent resistant) | Low (Resin breakdown) | Solid accepts industrial agents |
| Sanding Margin | Deep (Can be resurfaced) | Minimal (Surface only) | Solid allows for more errors |
But here is the catch: once engineered wood swells, the damage is typically permanent and cannot be sanded back to a flat state. Key Takeaway: Always prioritize dry or low-moisture methods when dealing with engineered substrates to prevent catastrophic fiber expansion.
III. Analyzing Veneer Thickness and Bond Limits
Determining the thickness of a veneer layer is essential before you attempt to remove paint from wood using mechanical or chemical means. Modern factory-produced furniture often features veneers as thin as 0.6mm, leaving almost no margin for error during the sanding or scraping phases of restoration.
Calculating Sanding Margins for Fine Veneers
Precision is mandatory when calculating how much material can be safely removed from a veneered surface without “sanding through” to the substrate. You must use high-grit abrasives and frequent visual inspections to ensure the integrity of the decorative layer remains uncompromised by the friction of the removal process.
- Measure veneer thickness at a hidden edge or drill hole using a digital caliper.
- Employ orbital sanders with variable speed controls to prevent heat buildup.
- Transition to hand-sanding for the final stages of paint removal on delicate antiques.
Preventing Delamination During Processing
Chemical delamination occurs when aggressive solvents dissolve the adhesive bond beneath the veneer, causing the wood to lift or peel. You should use “paste” style strippers that sit on the surface rather than “liquid” strippers that can seep through cracks and attack the glue line from below.
Look at it this way: the adhesive is the only thing keeping the furniture’s aesthetic surface attached to its structure. When working with Kids & Nursery Furniture , preserving these bonds is vital for safety and long-term durability in high-use environments.
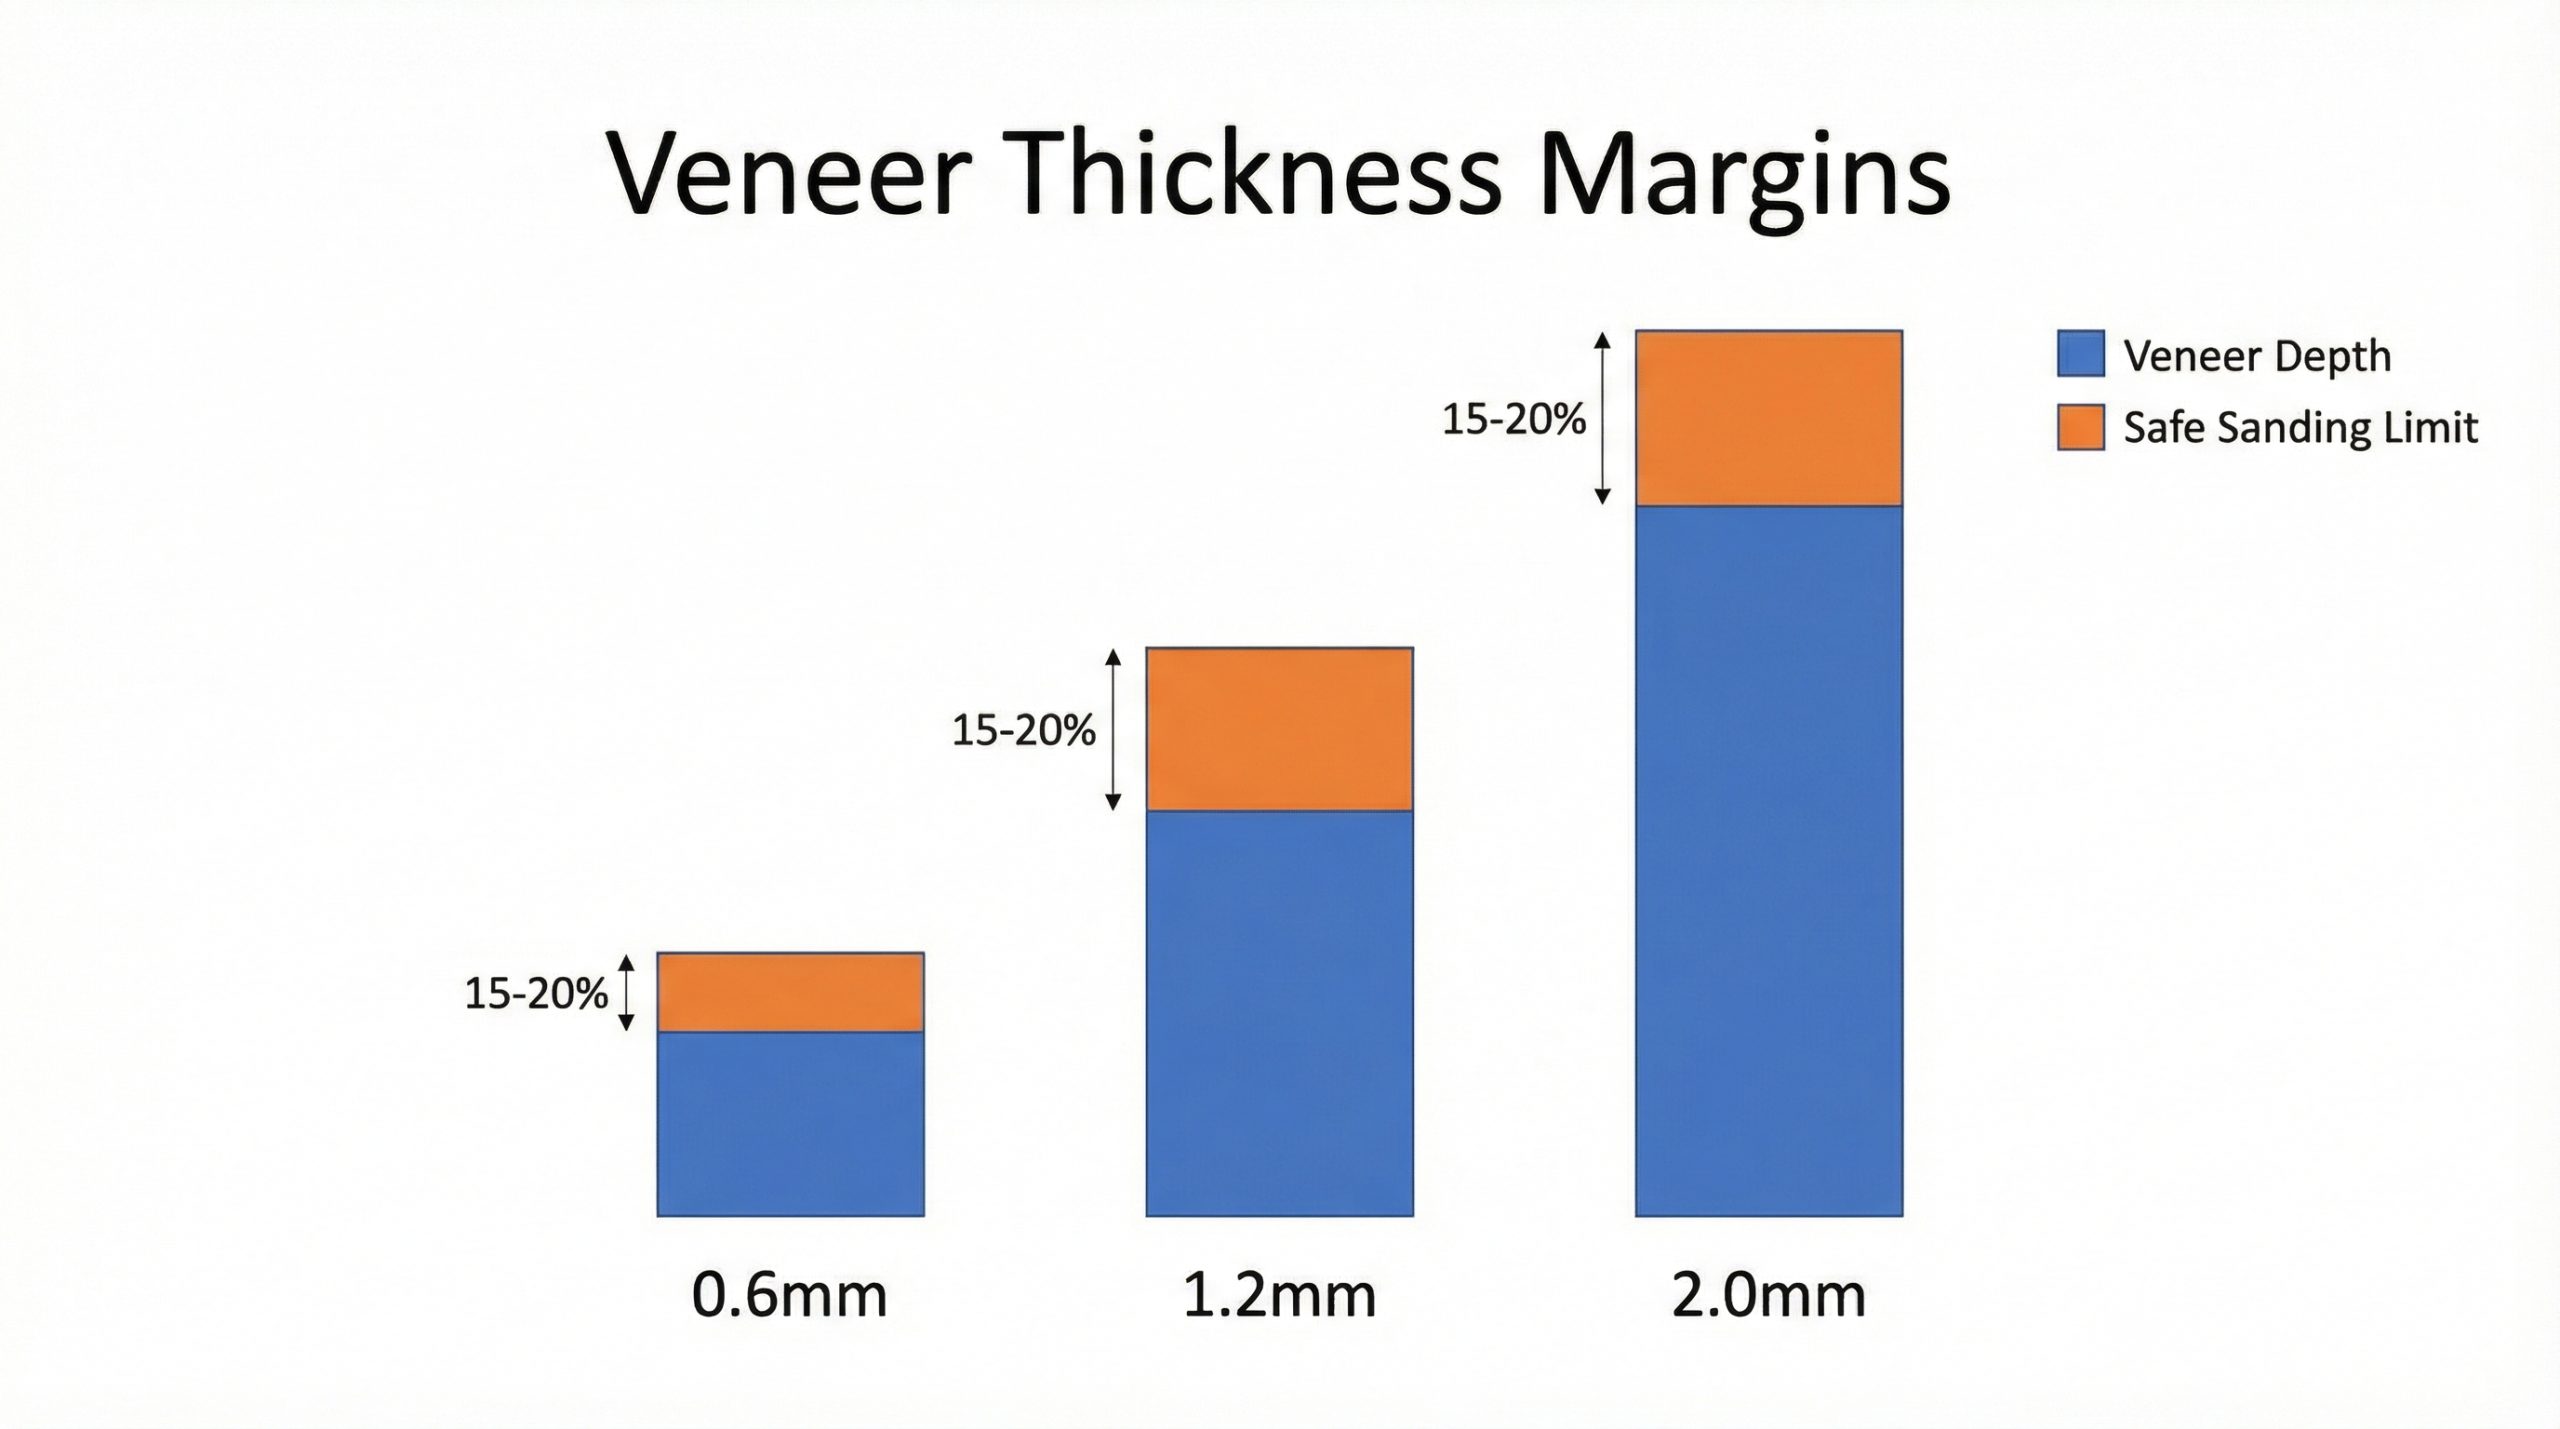
The following data summarizes the safe operational limits for various veneer depths.
| Veneer Depth | Recommended Method | Sanding Margin | Risk Level |
|---|---|---|---|
| 0.6 mm | Chemical Paste Only | < 0.1 mm | Extreme |
| 1.2 mm | Light Sanding | 0.2 mm | High |
| 2.0 mm + | Industrial Stripping | 0.5 mm | Moderate |
But here is the catch: even a 2.0mm veneer can be ruined by an over-zealous technician in seconds. Key Takeaway: Identifying veneer thickness before starting is the only way to determine the appropriate intensity of the removal method.
IV. Industrial Ways to Remove Paint from Wood
In a high-volume manufacturing environment, the goal is to remove paint from wood with maximum efficiency and minimal labor cost. Industrial facilities utilize specialized dip tanks and automated media blasting systems to process hundreds of components simultaneously while maintaining strict quality control.
Large-Scale Solvent Dip Tank Efficiency
Dip tank systems represent the pinnacle of industrial efficiency for stripping complex furniture pieces with intricate carvings or difficult-to-reach joints. By submerging the entire component in a temperature-controlled chemical bath, the paint is softened uniformly across all surfaces, allowing for a rapid pressure-wash rinse that leaves the wood substrate clean.
- Utilize tanks with integrated filtration systems to extend solvent lifespan.
- Implement overhead crane systems for safe and consistent immersion times.
- Monitor chemical concentrations daily to ensure optimal stripping speed and safety.
Automated Media Blasting for Bulk Orders
Automated media blasting uses fine particulates like walnut shells or baking soda to gently abrade the paint layer without damaging the underlying wood fibers. This dry process is particularly effective for Wooden Home Accessories where maintaining a precise moisture content is critical for preventing post-process warping.
Believe it or not: media blasting can be far more precise than hand-sanding when configured correctly. The air pressure and media flow can be adjusted to target only the paint layers, leaving the natural patina of the wood untouched and ready for immediate refinishing or staining.
The table below outlines the operational advantages of industrial-scale removal methods.
| Method | Capacity | Labor Requirement | Best For |
|---|---|---|---|
| Solvent Dip Tank | High (Batch) | Low | Complex carvings/intricate frames |
| Media Blasting | Medium (Continuous) | Moderate | Flat panels and accessories |
| Automated Sanding | High (Single Surface) | Very Low | Uniform boards and flooring |
But here is the catch: industrial methods require significant initial investment in ventilation and safety equipment. Key Takeaway: Industrial stripping methods offer the lowest cost-per-unit for large projects but require strict adherence to environmental regulations.
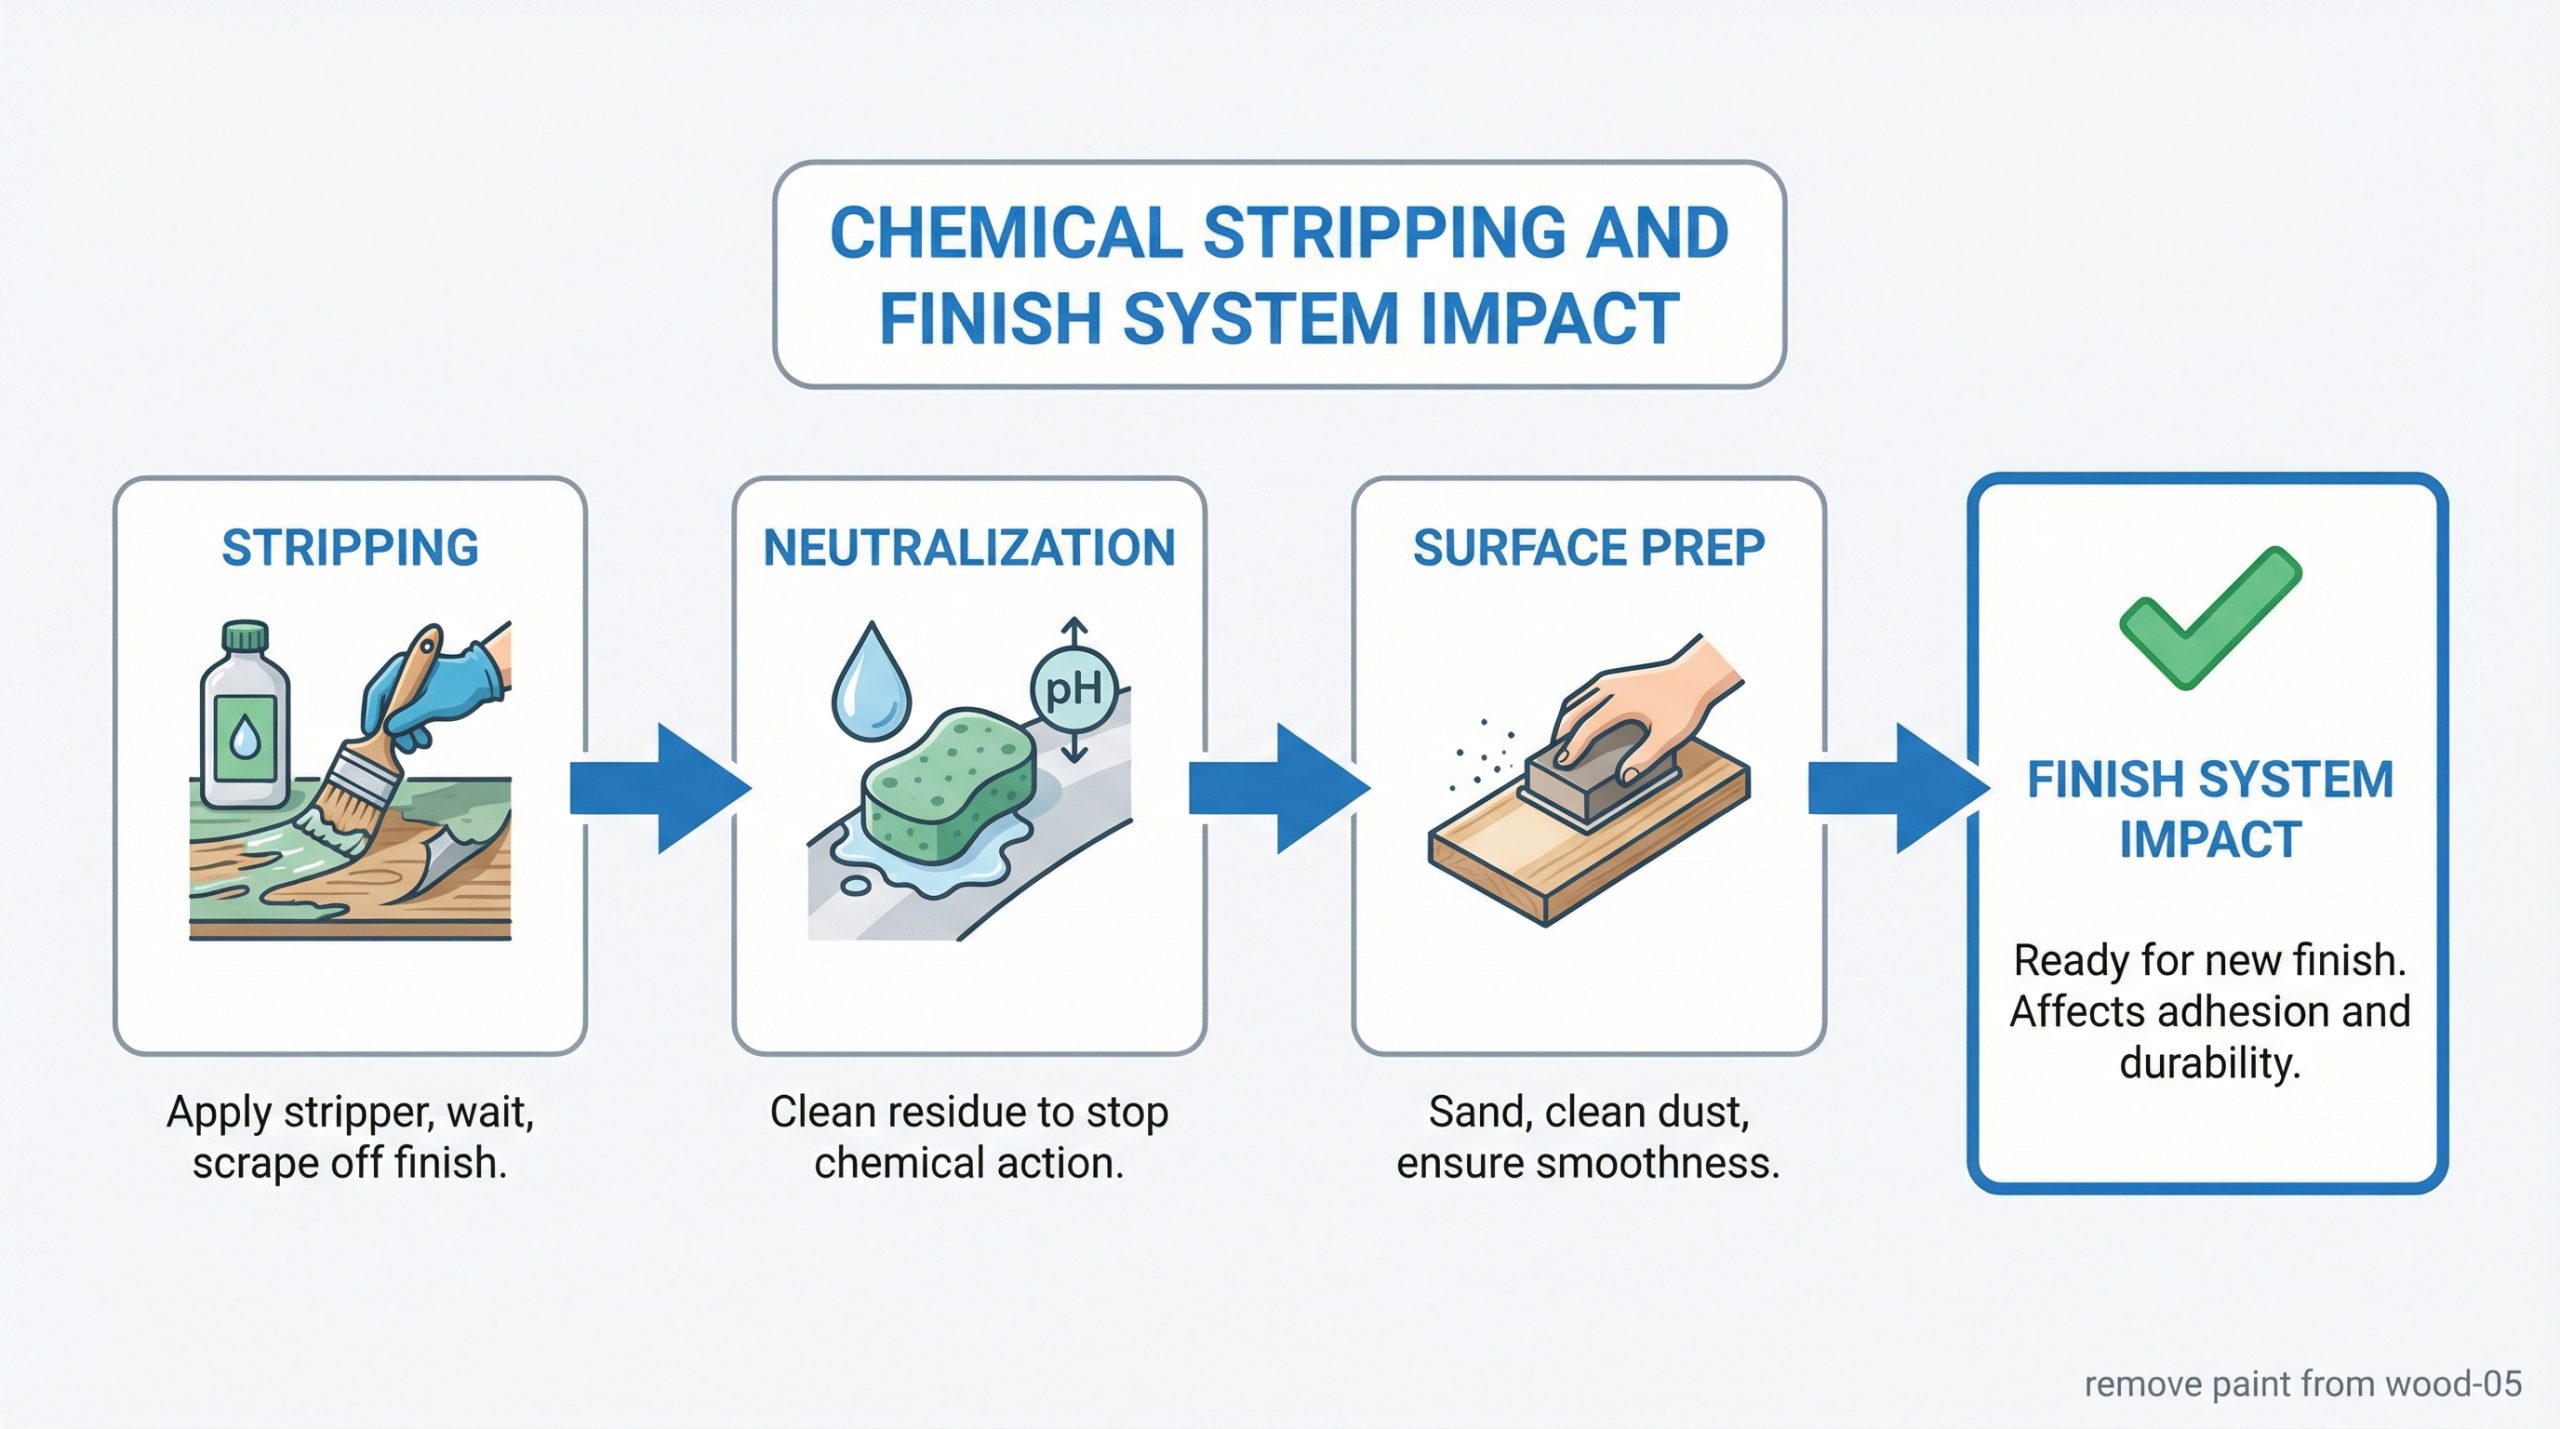
V. Chemical Stripping and Finish System Impact
Chemical agents are often the most effective way to remove paint from wood, but their use carries risks for both the substrate and the subsequent refinishing steps. If the chemicals are not properly neutralized, residual solvents can interfere with the adhesion of new stains and topcoats, leading to premature finish failure.
Solvent Neutralization Protocols
Neutralization is the process of stopping the chemical reaction of the stripper once the paint has been removed from the surface. You must use the specific neutralizing agent recommended by the manufacturer—often mineral spirits, denatured alcohol, or a vinegar solution—to ensure the wood’s pH balance is restored to a neutral state.
- Apply the neutralizer using a coarse abrasive pad to lift remaining residue.
- Allow for extended drying times to ensure all volatile organic compounds have evaporated.
- Conduct a “water bead” test to confirm that no oily residues remain on the wood surface.
Protecting Original Patina and Tannins
Aggressive chemical strippers can leach natural tannins from the wood, resulting in a “bleached” or lifeless appearance that is difficult to correct with stains. To preserve the natural warmth of the wood, you should select strippers with a balanced pH and avoid prolonged dwell times that allow the chemicals to penetrate the deep grain.
Think about it: the goal of restoration is to reveal beauty, not to chemically alter the wood’s identity. For more information on maintaining material integrity, you should consult our Buying Tips which cover material selection in depth.
This summary table highlights the impact of various chemical types on wood substrates.
| Stripper Type | Active Ingredient | Substrate Impact | Neutralizer Needed |
|---|---|---|---|
| Solvent-Based | Methylene Chloride | High (Fast acting) | Mineral Spirits |
| Biochemical | Citrus/Soy Esters | Low (Slow acting) | Soap and Water |
| Caustic | Sodium Hydroxide | Very High (Darkens wood) | Vinegar/Acidic Wash |
But here is the catch: caustic strippers can permanently turn oak and cherry black if left on too long. Key Takeaway: Choosing the correct chemical stripper is a balance between speed and the preservation of the wood’s natural color and fiber strength.
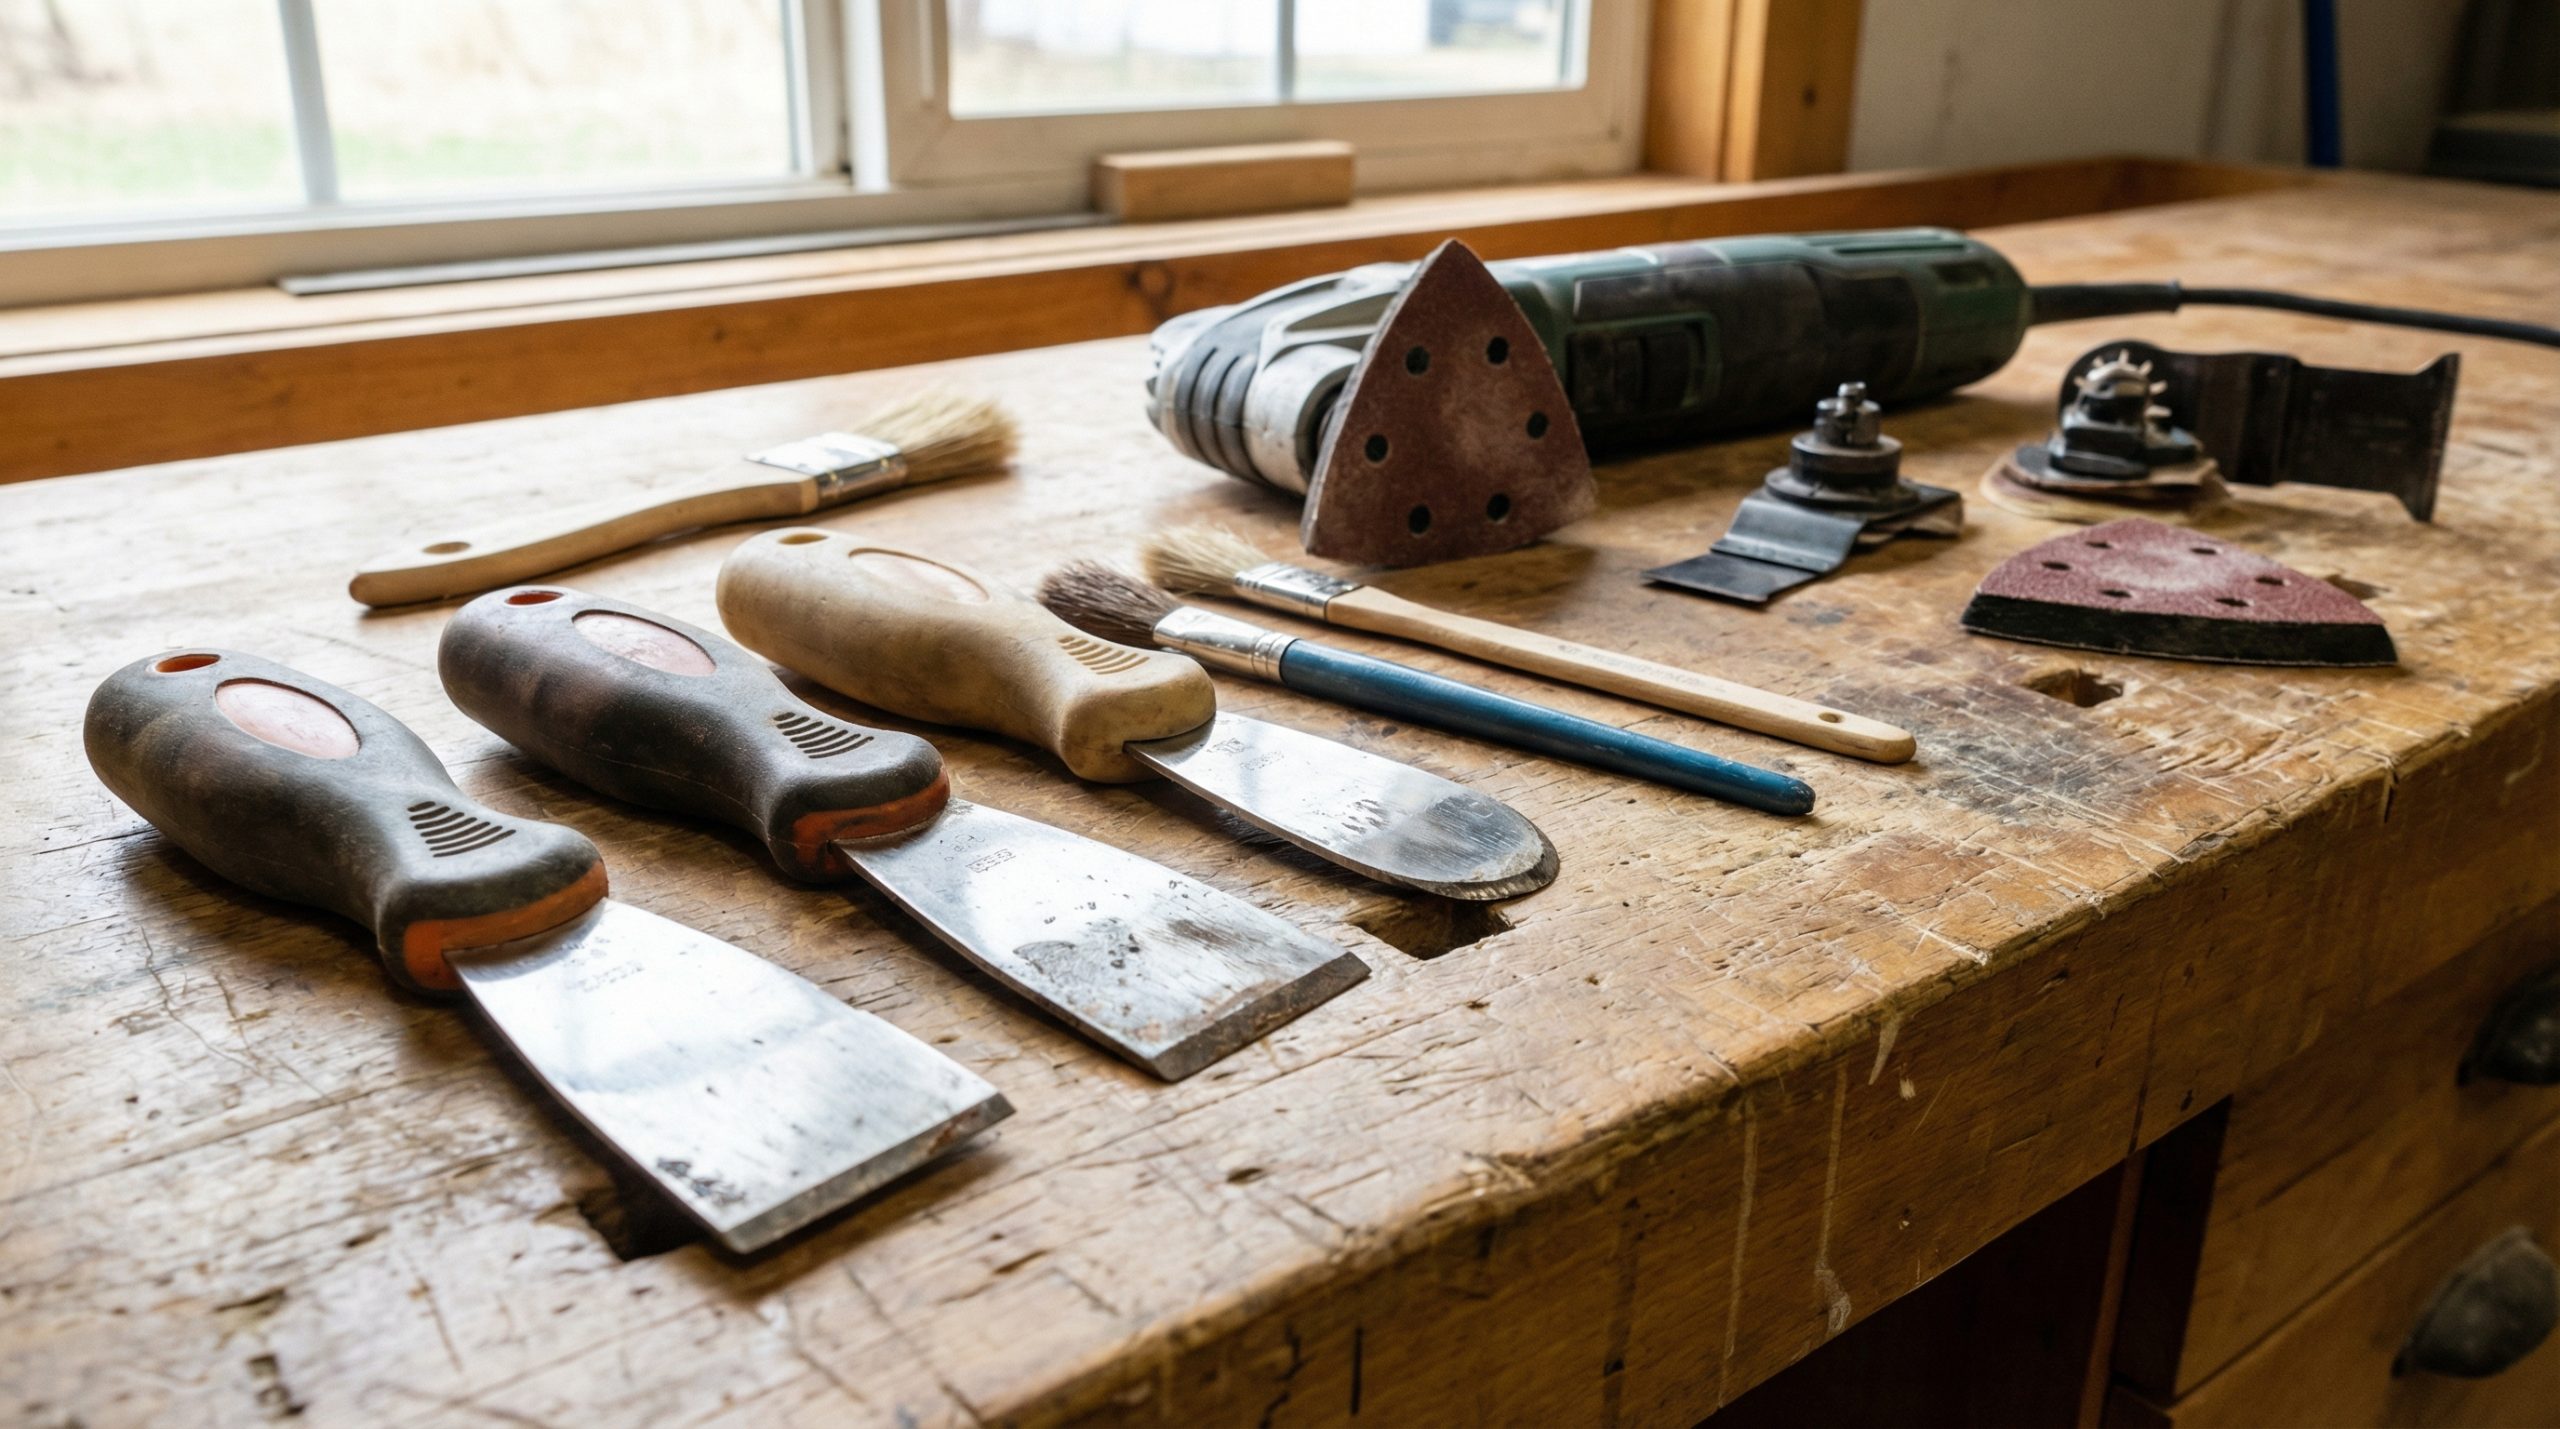
VI. Best Tools to Remove Paint from Wood
The selection of mechanical implements is the deciding factor in whether you remove paint from wood cleanly or leave a surface marred by gouges and scratches. Professional furniture makers rely on a combination of precision scraping tools and high-efficiency sanding equipment to achieve a factory-grade finish.
Precision Scrapers for Ornate Carvings
Precision scrapers, particularly those with interchangeable profiles, are indispensable for removing softened paint from moldings, turned legs, and decorative carvings. Unlike sandpaper, which can round off sharp edges, a well-sharpened scraper removes material in thin shavings, preserving the crisp lines of the original craftsmanship.
- Sharpen scrapers frequently using a burnisher to maintain a productive “hook” on the edge.
- Use pull-scrapers for flat surfaces and contoured blades for rounded profiles.
- Always scrape in the direction of the wood grain to avoid lifting fibers or causing “tear-out.”
High-Output Oscillating Sanders
Modern oscillating sanders provide a random motion that prevents the “swirl marks” typically associated with standard orbital sanders. When used in a multi-stage process—moving from coarse to fine grits—these tools can efficiently level any remaining paint fragments and prep the surface for its new finish.
But here is the catch: mechanical tools can be just as dangerous as chemicals if used with excessive pressure. You must let the weight of the tool and the sharpness of the abrasive do the work to prevent “dishing” the surface of the wood or creating uneven thickness across the piece.
The following table summarizes the most effective tools for various furniture components.
| Tool Type | Best Application | Efficiency | Risk of Damage |
|---|---|---|---|
| Cabinet Scraper | Large Flat Surfaces | Medium | Low |
| Contour Scraper | Moldings and Trim | High | Moderate |
| Random Orbit Sander | Bulk Paint Removal | Very High | High (Veneer risk) |
Think about it: the right tool not only speeds up the process but also reduces the physical fatigue of the technician. Key Takeaway: A combination of mechanical scraping and precision sanding is required to achieve a surface ready for professional-grade refinishing.
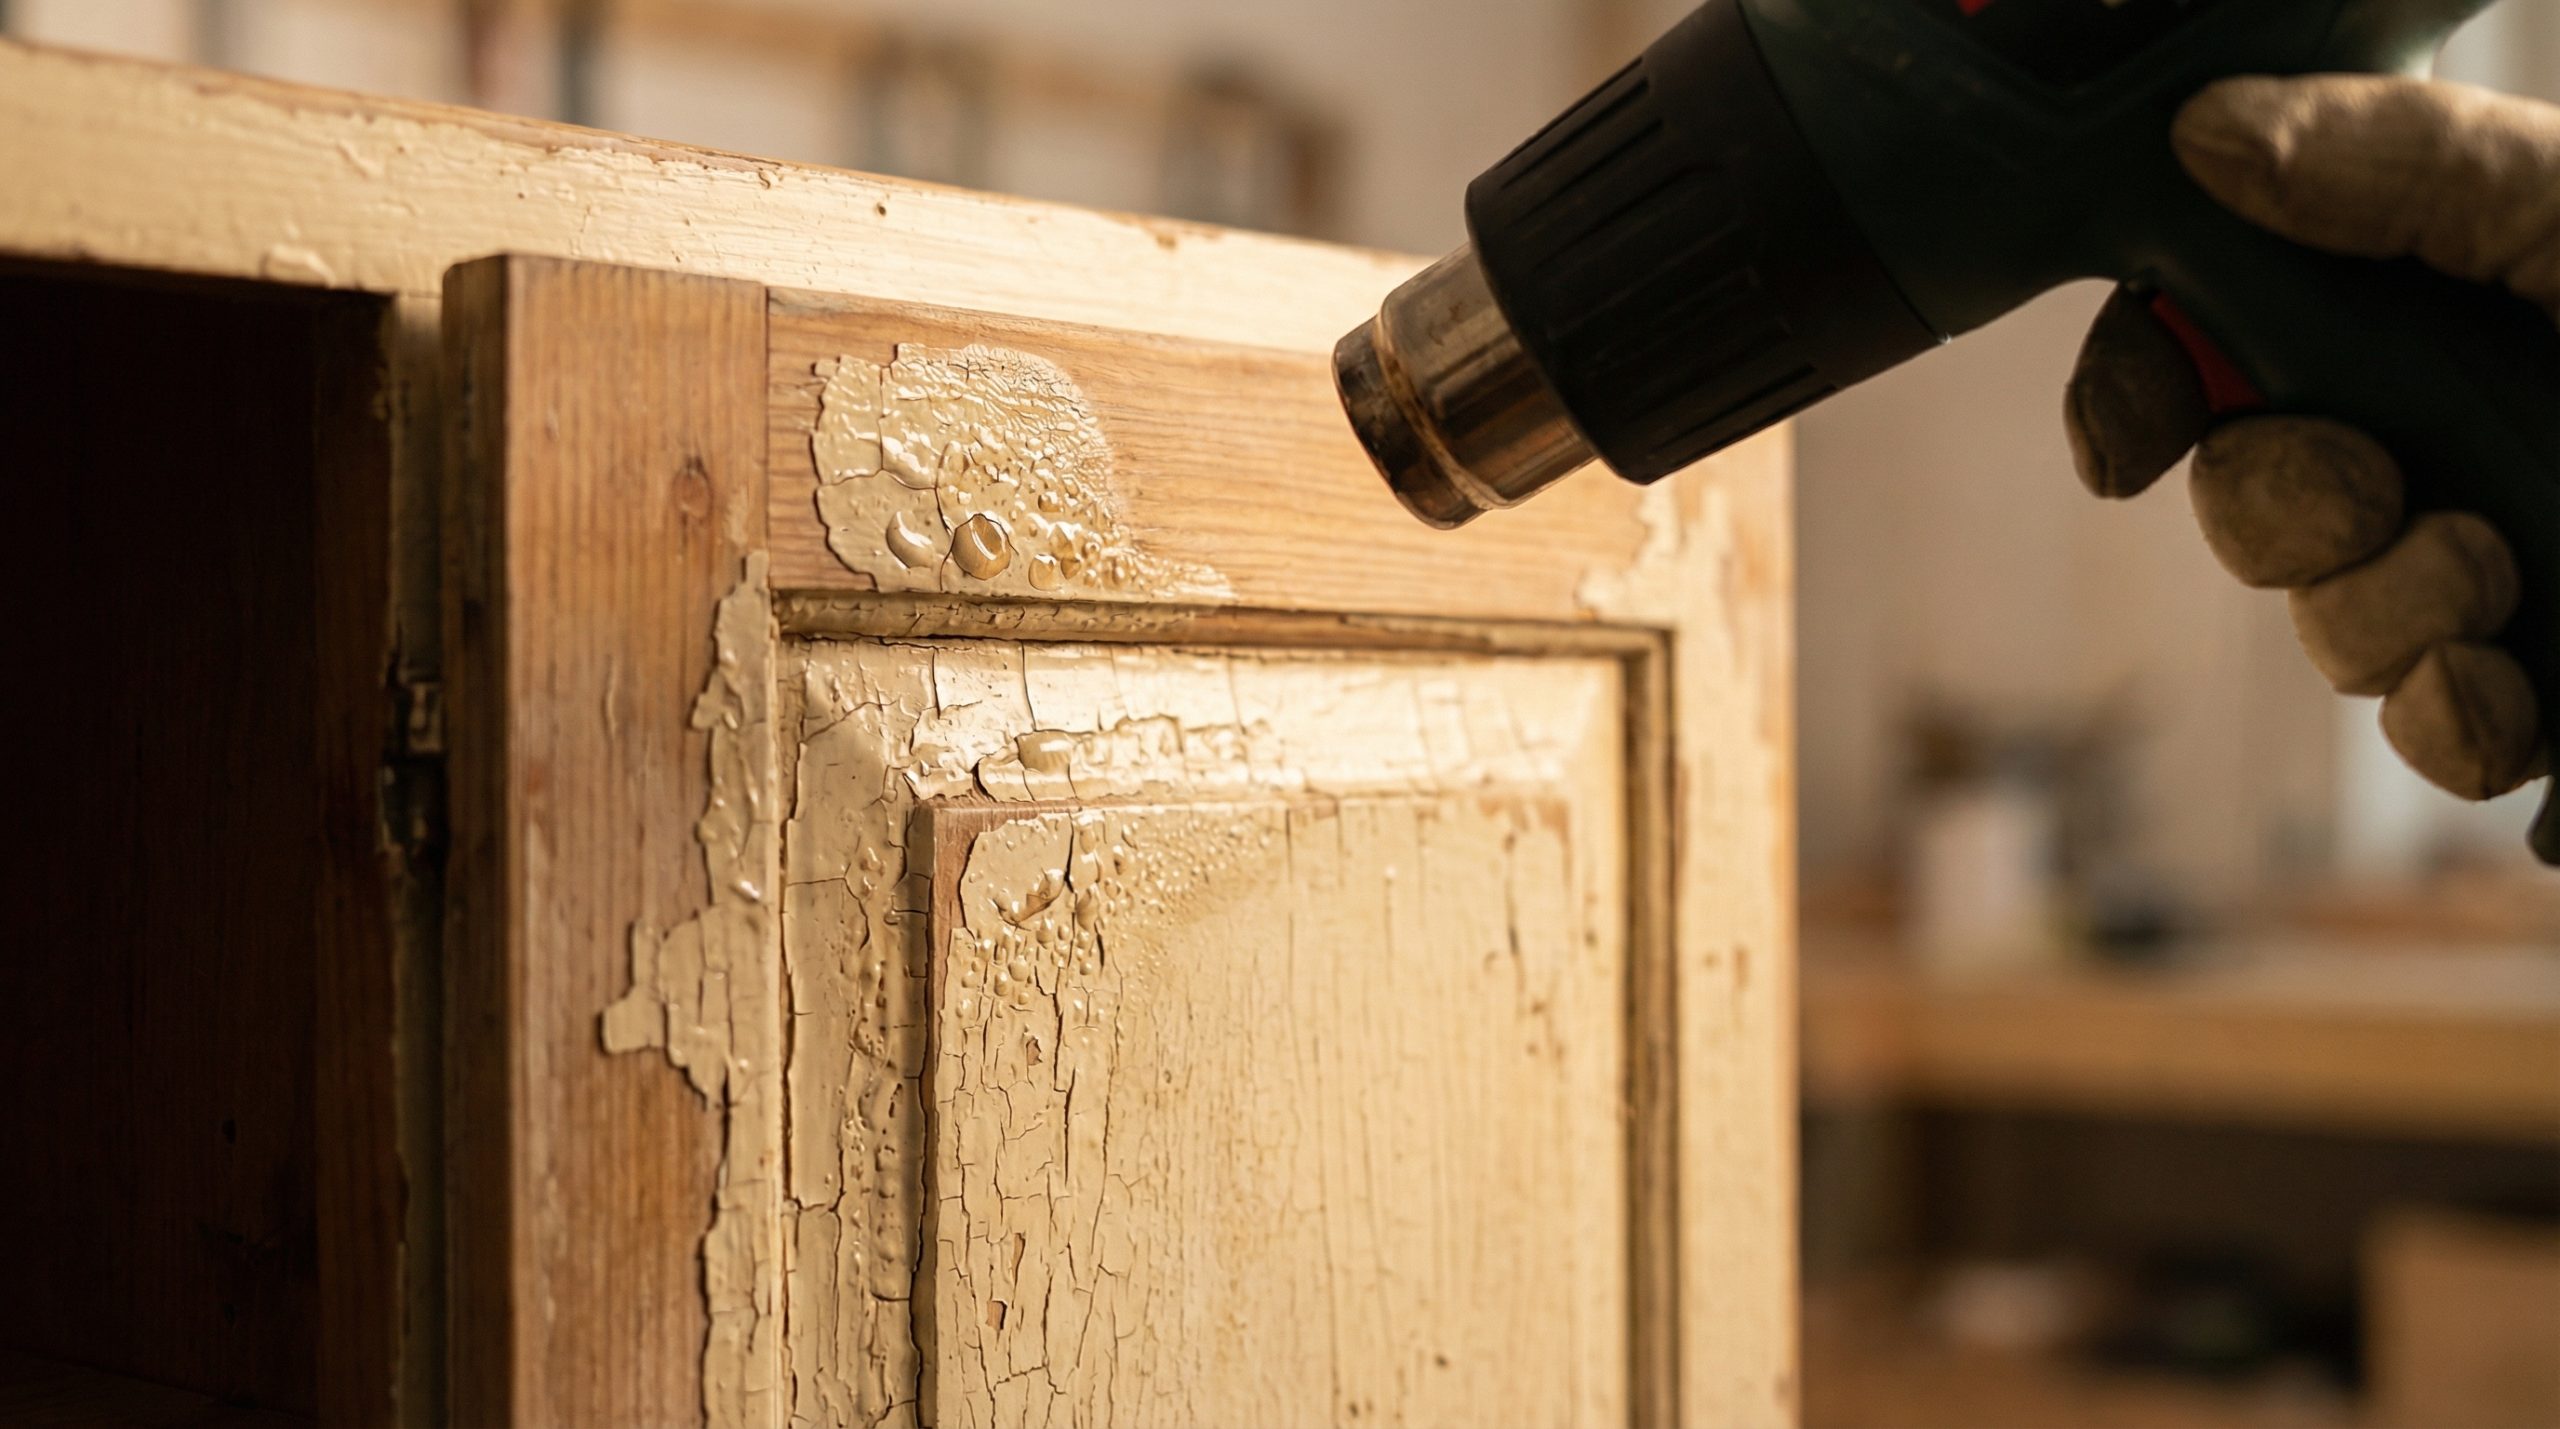
VII. Thermal Stripping vs. Precision Sanding
Thermal methods are a powerful alternative when you need to remove paint from wood that features multiple thick layers of old oil-based coatings. However, heat must be managed with extreme caution to prevent scorching the wood fibers or igniting dust and vapors trapped within the furniture’s structure.
Controlled Heat Gun Temperature Management
Using a heat gun requires a steady hand and a deep understanding of the flash points of various wood species. You should maintain a distance of approximately two to four inches from the surface, moving the heat source constantly to “bubble” the paint without allowing the temperature to reach a level that degrades the wood’s lignins.
- Use a heat gun with digital temperature controls to set a limit below 750°F (400°C).
- Work in small sections, scraping the softened paint immediately before it re-hardens.
- Wear heat-resistant gloves and a professional respirator to protect against toxic fumes.
Mechanical Abrasion and Dust Extraction
Precision sanding is often the preferred method for modern finishes that do not react well to heat, such as contemporary polyurethanes. The success of this method depends on high-quality dust extraction systems that keep the abrasive surface clear of debris, preventing “clogging” and ensuring a consistent removal rate.
Look at it this way: heat removes the bulk, but sanding provides the final surface quality. In many high-end furniture factories, the two methods are used in sequence—thermal stripping for the heavy lifting and precision sanding for the final substrate preparation.
The comparison below details the trade-offs between thermal and mechanical removal.
| Feature | Thermal Stripping | Precision Sanding | Verdict |
|---|---|---|---|
| Speed (Thick Paint) | Very High | Low | Thermal is faster for layers |
| Surface Finish | Rough (Requires sanding) | Smooth (Ready for finish) | Sanding gives better finish |
| Safety Risk | High (Fire/Fumes) | Medium (Dust inhalation) | Sanding is safer with PPE |
But here is the catch: heat can melt the glue in joints, causing the furniture to literally fall apart. Key Takeaway: Thermal stripping is best reserved for solid wood with heavy paint buildup, followed by mechanical sanding for surface refinement.
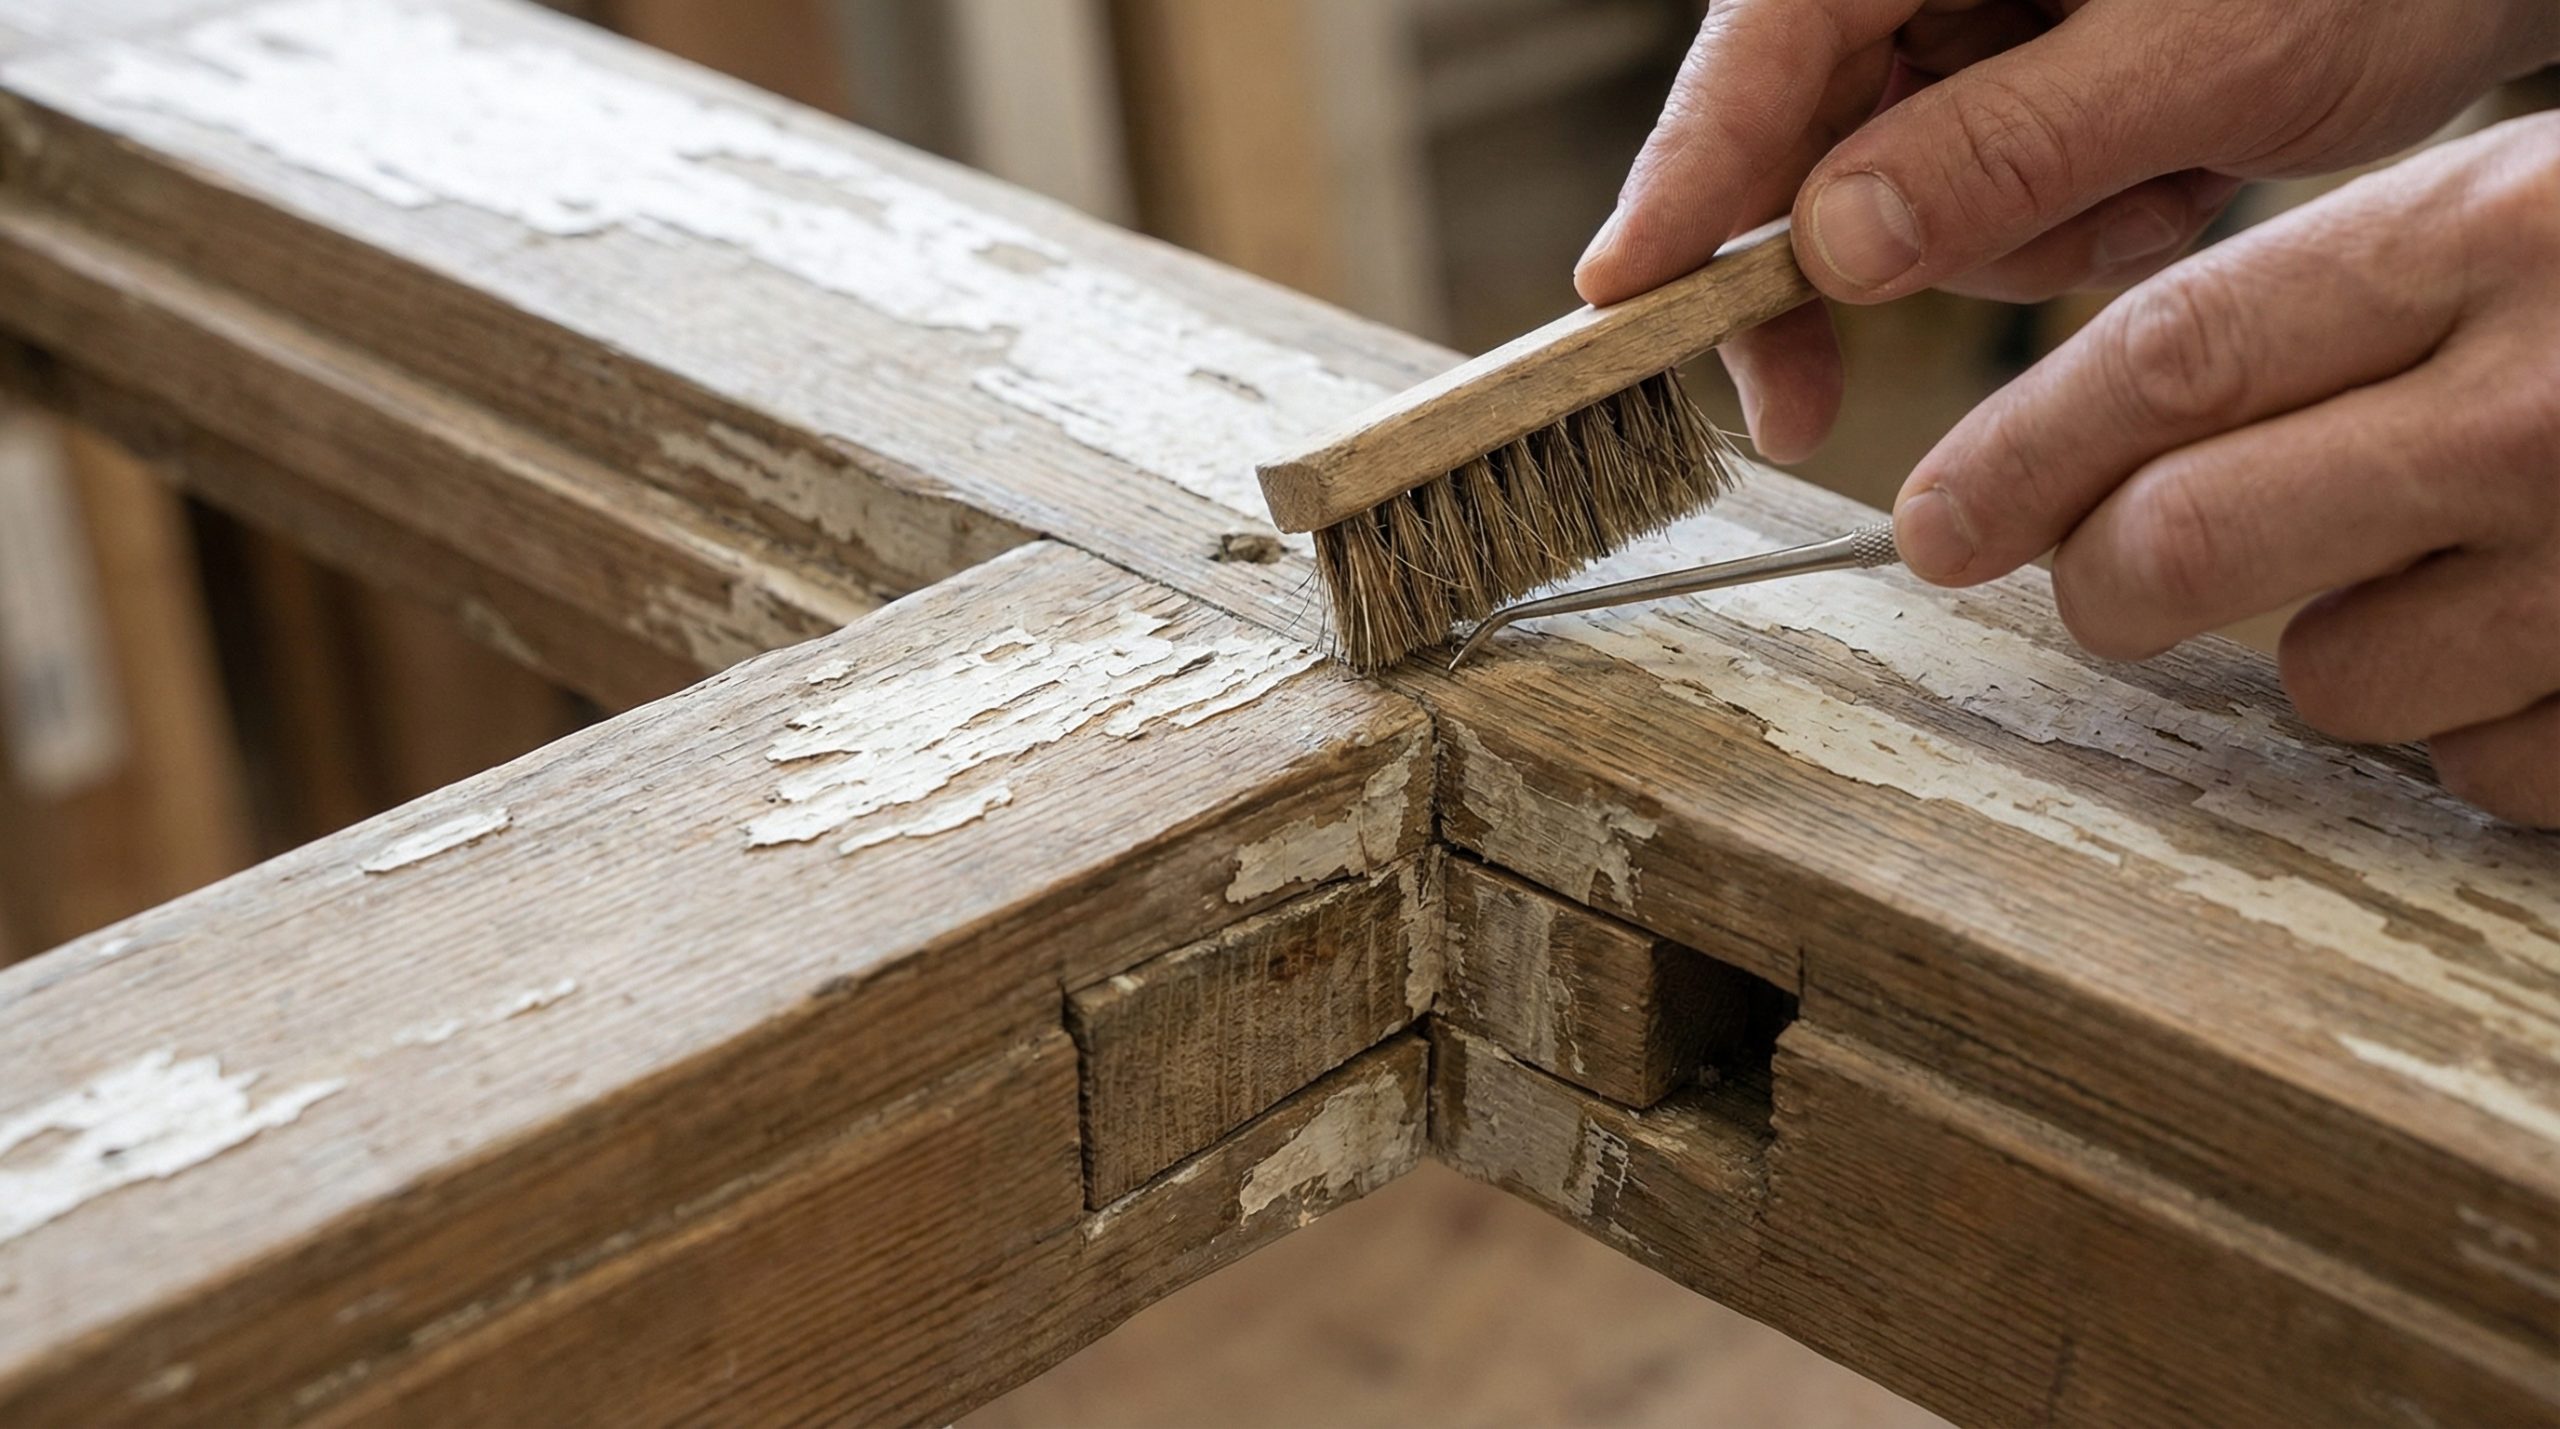
VIII. Safely Remove Paint from Wood Joints
Preserving the structural integrity of joinery is the most difficult aspect of the process when you remove paint from wood. Mortise and tenon joints, dovetails, and dowels are often hidden beneath layers of paint, and aggressive stripping can weaken the very connections that keep the piece stable.
Protecting Mortise and Tenon Integrity
The strength of a mortise and tenon joint relies on a tight “wood-to-wood” fit and the integrity of the adhesive bond. You must avoid allowing liquid strippers to pool in the joint gaps, as the chemicals can dissolve the old hide glue or PVA, leading to “joint creep” or complete structural failure.
- Use dental picks and small brass brushes to clean paint from joint lines manually.
- Apply painter’s tape to seams if using liquid chemicals on surrounding panels.
- Re-clamp joints during the drying process if any softening of the adhesive is suspected.
Adhesive Compatibility Post-Stripping
Once the paint is removed, the wood fibers must be clean and free of chemical residue to allow for successful re-gluing of any loose joints. If residual stripper remains in the grain, new adhesives will fail to penetrate the fibers, resulting in a weak “surface-only” bond that will break under the stress of daily use.
Think about it: a beautiful finish is worthless if the chair collapses under the user. If you are unsure about the structural state of your inventory, please Contact our technical team for a professional assessment.
This summary table provides guidelines for managing joints during the stripping process.
| Joint Type | Cleaning Method | Primary Risk | Preservation Tip |
|---|---|---|---|
| Mortise & Tenon | Manual Scraping | Glue Dissolution | Keep chemicals away from seams |
| Dovetail | Soft Brush / Solvent | Corner Chipping | Work with the grain direction |
| Dowel Joint | Precision Pick | Dowel Swelling | Use fast-evaporating solvents |
But here is the catch: many old pieces used water-soluble hide glue, which reacts instantly to moisture. Key Takeaway: Protecting joinery during paint removal is a mandatory step to ensure the long-term structural viability of restored furniture.
IX. Remove Paint from Wood: Commercial Feasibility
From a business perspective, the decision to remove paint from wood must be based on a clear analysis of labor costs versus the projected market value of the refinished item. In many cases, the time required to strip a complex piece manually exceeds the profit margin, making industrial automation or replacement a more viable strategy.
Throughput and Labor Cost Analysis
In a commercial setting, every hour spent on stripping is an hour that cannot be spent on assembly or finishing. You must calculate the “man-hours” required for each piece and compare this to the cost of purchasing new, unfinished components from a reliable supplier.
- Track actual labor time across multiple pieces to find an average “stripping rate.”
- Factor in the cost of chemicals, abrasives, and hazardous waste disposal.
- Evaluate whether the piece’s “intrinsic value” justifies the high labor overhead.
Environmental and Safety Compliance
Operating a professional stripping facility involves significant regulatory oversight regarding VOC emissions and lead-based paint disposal. You must invest in certified ventilation systems and provide staff with medical-grade PPE to ensure compliance with local and international health standards.
Believe it or not: the cost of disposing of chemical sludge can sometimes exceed the cost of the chemicals themselves. Businesses that fail to account for these environmental costs often find their margins disappearing into unforeseen operational expenses.
The table below assists in determining the economic viability of restoration projects.
| Project Type | Labor Intensity | Material Cost | Recommendation |
|---|---|---|---|
| High-End Antique | Very High | Moderate | Economically Feasible |
| Standard Retail | High | Low | Replace with New Components |
| Bulk Institutional | Medium (Automated) | High | Industrial Stripping Only |
But here is the catch: the “unconfirmed grey areas” of labor estimation are where most businesses lose money. Key Takeaway: Only undertake paint removal when the projected resale value or historical importance justifies the substantial labor and compliance costs.
X. Refinishing After You Remove Paint from Wood
The final step after you remove paint from wood is preparing the surface to accept a new, high-quality factory finish. This stage is where the quality of the stripping process is truly tested, as any missed paint or chemical residue will be magnified by the application of new stains and topcoats.
Surface Preparation for Professional Stains
Achieving a uniform color requires that the wood pores be completely open and free of any contaminants. You should perform a final “denatured alcohol wipe” to check for any missed spots of paint or wax, as these areas will resist the stain and create a blotchy, unprofessional appearance.
- Sand the surface through a progression of grits (120, 150, 180) for optimal absorption.
- Use a tack cloth to remove every particle of dust before applying the first coat.
- Consider a wood conditioner for porous species to ensure even pigment distribution.
Achieving Factory-Grade Topcoat Adhesion
Adhesion is the mechanical and chemical bond between the wood substrate and the protective topcoat. To ensure the new finish does not peel or flake, the wood must be dry (moisture content below 12%) and the surface must be slightly abraded to provide “tooth” for the coating to grip.
But here is the catch: if you used an oily stripper, the new finish might never dry properly. To prevent this, professional shops often apply a “barrier coat” of dewaxed shellac before moving to modern lacquers or water-based polyurethanes.
This summary table outlines the steps for a successful post-stripping refinish.
| Step | Action | Objective | Success Metric |
|---|---|---|---|
| De-contamination | Solvent Wipe | Remove oils/waxes | Uniform surface wetting |
| Grit Progression | 120 -> 180 Sanding | Smooth the grain | No visible scratches |
| Pre-Sealing | Shellac/Conditioner | Prevent blotching | Even stain penetration |
Think about it: the preparation is 90% of the finish quality. Key Takeaway: Successful refinishing is impossible without a perfectly clean and neutralized substrate following the paint removal process.
Frequently Asked Questions
- Can I remove paint from wood using just a power sander?
No. Using only a sander will likely clog the abrasive immediately with melted paint and can easily gouge the wood or sand through veneers before you realize the paint is gone.
- What’s the best way to tell if all the chemical stripper is gone?
Perform a “water test” by misting the wood; if the water beads up or forms oily circles, residual chemicals or waxes are still present and must be neutralized further.
- Can I use a heat gun on lead-based paint?
No. Heating lead-based paint creates highly toxic lead vapors that are easily inhaled; you must use a chemical stripper designed for lead or wet-scraping methods to stay safe.
Final check
Damaged wood grain and warped substrates are the primary risks when you remove paint from wood without professional oversight. By following these factory-grade protocols, you ensure structural integrity and a perfect finish. For reliable sourcing or manufacturing assistance, please contact us to see how our expertise can support your next furniture project.